Creating our WebRTC demo
16 November 2021
Introduction
Hello everyone! Six months ago I started a one year work/study training program at Wazo as a front-end developer. Wazo has a huge development framework to get used to, and what is better than a concrete project to learn the Wazo SDK?
That is how I have been assigned to the WebRTC demonstration project, which will be useful to anyone wondering what we are able to do with the Wazo SDK.
The main goals I had when I took over the project were the following :
- Totally redesign the application to improve user experience
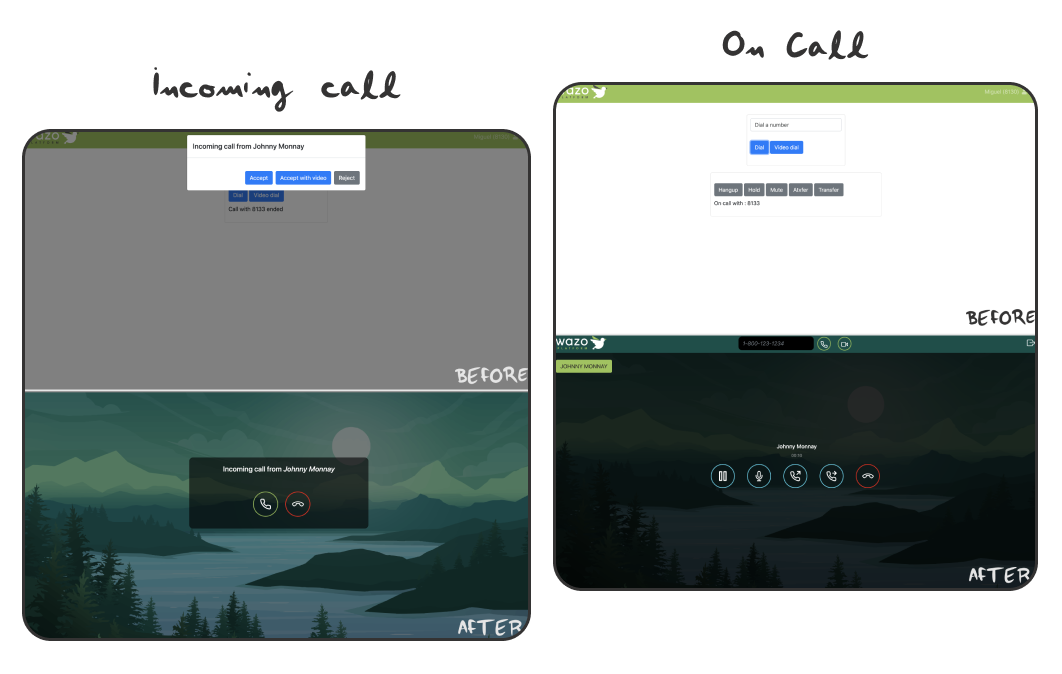
- Set up phone & video call, transfer & indirect transfer
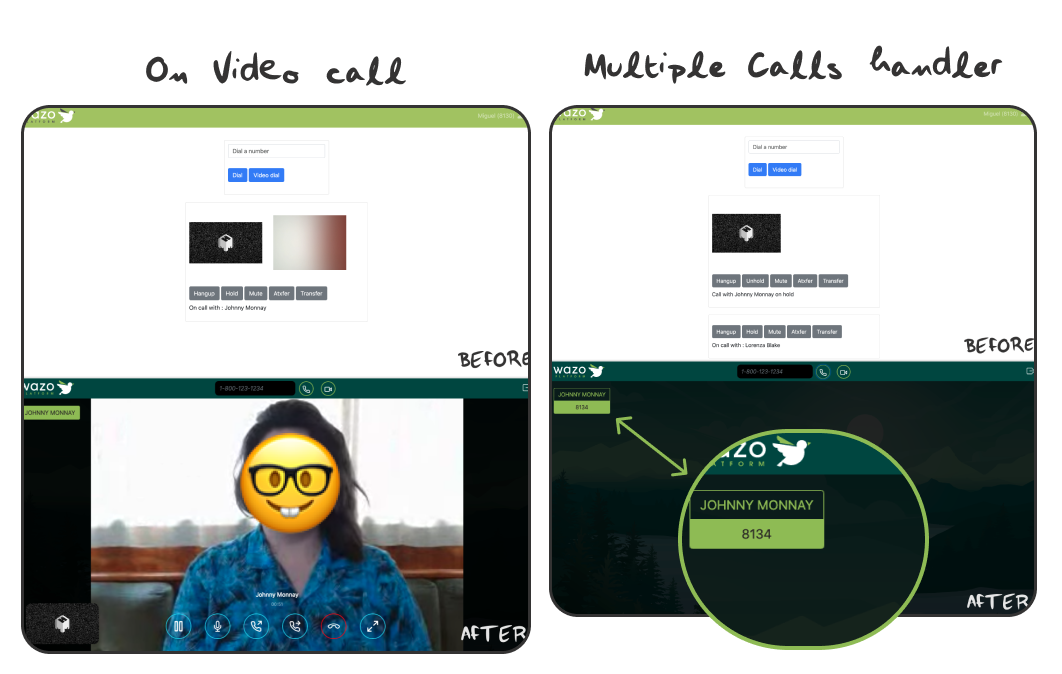
- Being able to call another number while already on call & switch between interlocutors
Launching the Demo at Home
If you want to take a closer look at the code and the demo itself and do not have access to our server, please follow this tutorial on how to install the webrtc demo written by Sylvain Boily.
If you already have access to our server, you can clone the following repository : wazo-webrtc-demo and read the instructions in the README.md.
Feel free to report any bugs !
Redesigning the Interface
I prepared some screenshots so you can notice the difference between the application before and after I redesigned it. The main styling was based on a few mock ups. You can take a look here at the home page mock up.

What you can’t see in the screenshots is the way the interface is moving. I decided to animate every button : when you hover them, they fill up. The same goes for the logout button : when you hover it, it spins backwards and the real logout button appears. I also looked up on the internet to find better backgrounds : a landscape at dawn for the login page, and a landscape at daylight for the rest of the application.
Now let’s take a look at those screenshots !
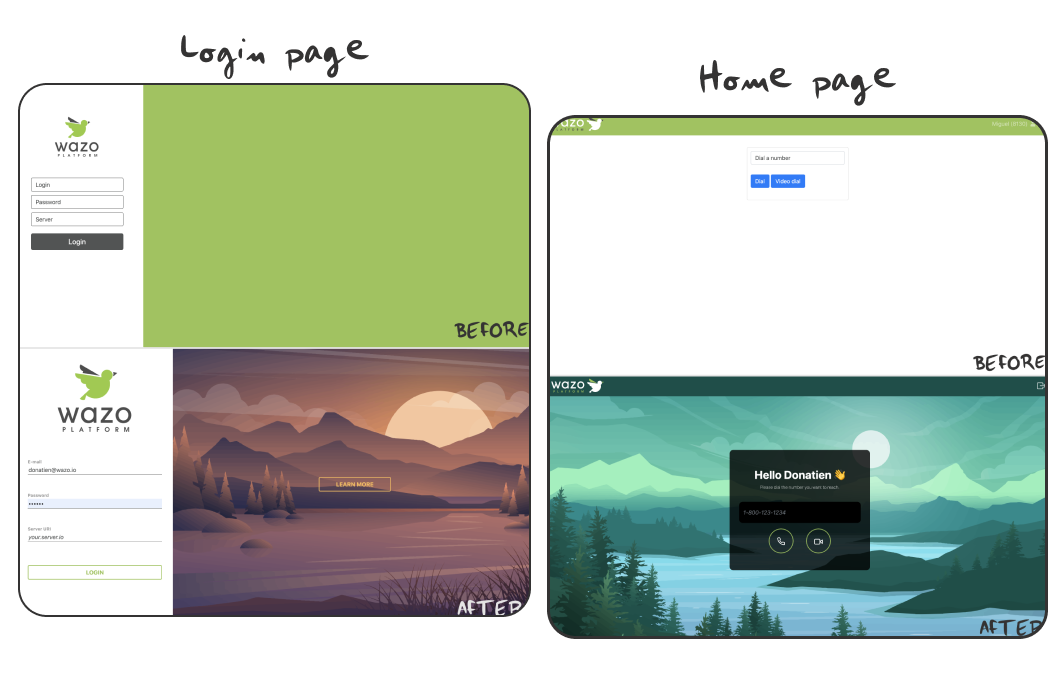
 Background images created by Jcomp for Freepik.
In the last screenshot, you can see the multiple calls display styling. I would like to dig deeper into this feature, and take a look at the code behind it.
Zoom on the Multiple Calls Display
As you may notice, we decided to work with JQuery on this project so we're not drowned in unuseful and big packages like it would have happened if we used a framework.
First, let’s go into the dialer.js file. This file contains every function that will build our dialer (from dialing to video calling and receiving calls). On top of this file, we create an empty object : sessions, which is a Wazo object you can use to store your call sessions. On the other hand, currentSession is initialized and will be used later.
const sessions = {};
let currentSession;
The updateScenes function is called every time something is changed in our
scene. A scene is a call session : the interlocutor name, the buttons, etc…
Let’s take a look at what is happening from Object.keys... to the end of the code block. We are looking into the sessions object and for each session we are fetching :
- The corresponding session id
- The session’s associated number
We set up currentSession on the callSession id if the session is active (we’re on call with this session’s number).
const updateScenes = status => {
  const noActiveSession = !Object.keys(sessions).length;

  $('#scenes').html('');
  $('#calls-handler').html('');

  ///[...]

  Object.keys(sessions).forEach(sessionId => {
    const callSession = sessions[sessionId];
    const newScene = addScene(callSession, callSession.cameraEnabled);
    const isActive = currentSession.is(callSession);
    const label = getNumber(callSession);

    if (!isActive) {
      newScene.hide();
    }

    const $bouton = $('#calls-handler').append(
      `<button type="button" data-sessionid="${sessionId}" class="btn switch-btn ${
        isActive ? 'active' : ''
      }">${label}</button>`
    );
    $bouton.click(switchCall);
  });
};
We also add a button corresponding to each session inside our calls handler HTML container (we will take a look at it later). This button calls an event named switchCall, let’s study it next.
const switchCall = event => {
  event.stopImmediatePropagation();

  const sessionId = $(event.target).attr('data-sessionid');
  const callSession = sessions[sessionId];

  if (currentSession.is(callSession)) {
    console.log('active call, no switching');
    return;
  }

  console.log(`attempting to resume callSession "${getNumber(callSession)}"`);
  unhold(callSession);
  currentSession = callSession;
  updateScenes();
};
This function enables switching sessions on click : the sessionId is set to the event target, so we can define the callSession on this new session. If the current session is identical to the call session we just registered, no switching will occur.
If they’re not the same, the current session becomes the call session, and we can resume the call session. (The current session is put on hold when we accept a call if a current session is existing, in an accept function).
As you can see in the next code sample, the HTML code is as simple as that. I chose Bootstrap to create a group of buttons with an active property used in the updateScenes function we studied earlier. In this same function, the container is filled thanks to the loop on the sessions.
<div id="calls-handler" class="btn-group-vertical"></div>Finally, here is how the calls handler was designed. It's displayed in a corner, on top of our call scene. For the handler buttons I used the transition property to animate them, and set up the active styling on something different so we can distinguish which interlocutor we’re on call with.
#calls-handler {
  position: absolute;
  left: 1rem;
  top: 5rem;
  z-index: 10;
}
.switch-btn {
  border: 1px solid #98c451;
  color: #98c451;
  box-shadow: inset 0px 0px 0px 0px #98c451;
  transition: box-shadow 0.5s, color 0.3s;
}

.switch-btn:hover {
  color: rgb(46, 44, 41);
  box-shadow: inset 0px 50px 0px 0px #98c451;
  transition: box-shadow 0.5s, color 0.3s;
}

.active {
  background: #98c451;
  color: rgb(46, 44, 41);
}
Challenge Completed?
The project is so wide it could always need some changes and tweaks, but I can say the goals I mentioned before in this article were achieved.
Working on the demo made me more comfortable with the development environment Wazo created over the years, and to be honest, with simple Javascript and JQuery programming. Also, I would like to thank Jeff for helping me when I was facing issues, and Wazo for trusting me with this project.
Now we have our very own WebRTC demo, and I hope you enjoy the way it looks and works !